When we talk about undervoltage and overvoltage relay, we mean the core of electrical safety in your home. These devices constantly monitor voltage, and when levels fall outside your preset window, they immediately disconnect power to protect sensitive appliances from both high spikes and low drops.
What Are Undervoltage and Overvoltage Relay?
Undervoltage relay: This relay watches for voltage dips, and if things drop too low, it cuts off power to avoid stressing motors and electronics.
Overvoltage relay: This relay watches for voltage rises above your safe threshold, and if things rises too high, the relay kicks in and stops power flow to prevent damage from sudden surges.
Today’s relays often combine both in a single unit which will provide a full protection in only one device
How to Adjust the Undervoltage and Overvoltage relay?
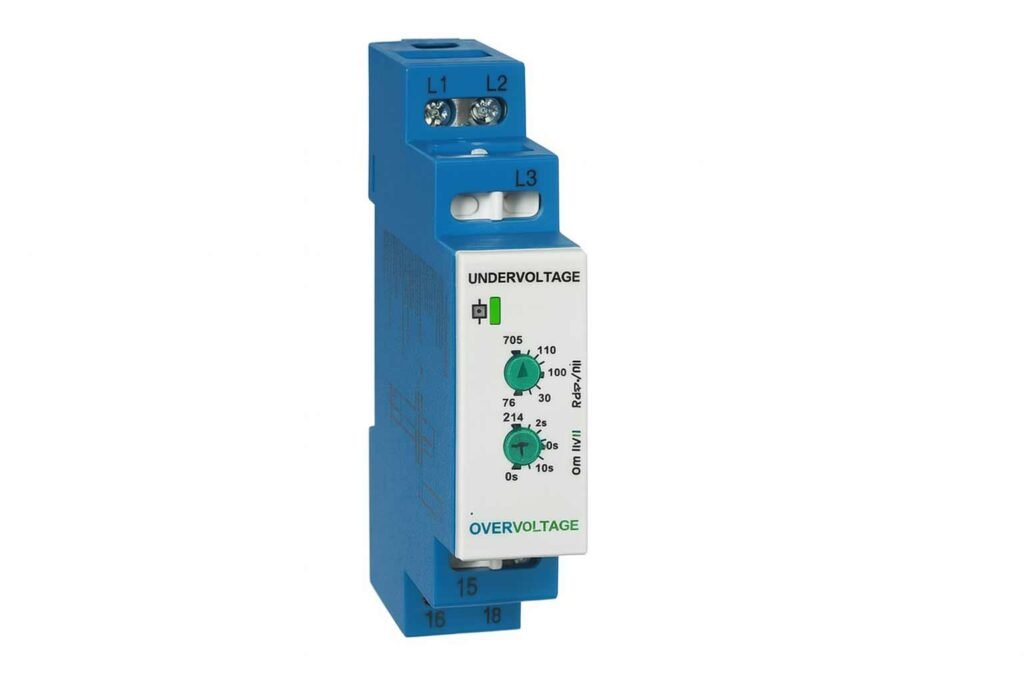
Let’s now understand how to adjust the undervoltage and overvoltage settings using the relay shown in the image.
Most protection relays use percentage values based on the system’s nominal voltage. This makes adjustment easier across different voltage levels.
Example
Assume the nominal voltage is 230 V.
If you set the undervoltage to 90%, the actual trip voltage becomes:
0.9 × 230 = 207 V
So the relay will disconnect the power if voltage drops below 207 V.
For overvoltage, if you adjust it to 110%, the trip point becomes:
1.1 × 230 = 253 V
That means the relay cuts off power if the voltage exceeds 253 V.
Time Delay
There’s also a time delay setting, which defines how long the relay waits before tripping. This helps avoid unnecessary disconnections due to momentary fluctuations. If either overvoltage or undervoltage occurs and lasts longer than this delay, the relay will activate.
Why You Need One in Your Home
1-Real protection for real-life appliances
No more blown TVs or damaged LEDs when the grid goes wonky. These relays guard everything, from fridges to computers.
2-Improves system reliability
Your electrical setup stays within safe norms, reducing random faults or equipment failure.
3-Saves money
Avoid costly repairs or replacements due to voltage damage.
4-Peace of mind
Knowing your home is guarded against fluctuations gives you one less stress to worry about.
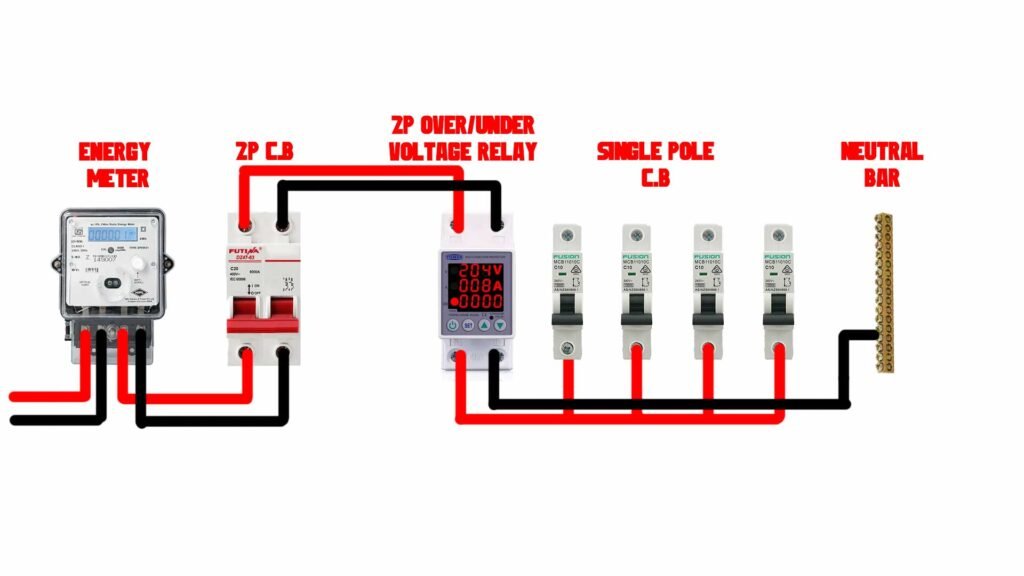
How to Install (Single-Phase Example)
Follow this guidelines to successfully install undervoltage and overvoltage relay inside your home electrical panel, note that this type can disconnect power by itself
1-Tools & Parts
Undervoltage and Overvoltage relay
Screwdriver, wire stripper & connectors
Multimeter or Voltage tester
Electrical panel access
Personal protective gear (gloves, goggles)
2-Step by Step
Turn off main power
Ensure turning off main power and measure voltage with multimeter or voltage tester
Mount inside panel
Monitor a full circuit or target a specific one. Always ensure space and ventilation.
Wiring
Wire the output cables from main circuit breaker to the input of the undervoltage relay then the output to the load flow.
Set configurations
Use the relay’s knobs/dials to set upper and lower voltage limits as we did in the past section. Consult your relay’s manual for recommended settings
Test it
Power back on. Simulate voltage variation or observe grid behavior. Ensure the relay disconnects at set thresholds and resets when voltage normalizes.
Maintenance & Check-Up
Inspect monthly, check wiring, terminal tightness, and any physical signs of damage.
Test relay function seasonally or if sudden grid fluctuations occur.
More Advanced Options
Some units include time-delay settings to prevent nuisance trips from short blips.
Digital/microprocessor relays offer precise adjustment, logging, and self-tests.
For smart homes or unstable grids, consider relays with remote remote monitoring or GSM alerts.
Final Thoughts
Overvoltage and undervoltage relays are essential guardians for your home’s electricity. They’re simple but effective and can safely disconnect power when things stray outside preset limits, falling back in when stability returns.
Subscribe to Electrical Engineering Planet YouTube Community to get fresh and trending electrical topics delivered straight to your inbox